通研院发表物理可交互的3D场景生成Physcene,显著提升具身智能体 ...
当前页所有图片 (240)
十方融海小智AI跃居GitHub全球排行榜第一,引领AI硬件新时代_TOM资讯
小智
乐鑫代理商飞睿科技,官方整活,github 爆火的“小智”ai,出新品了!

ai小智如何革新采购供应链管理

Man Wearing Gray and Red Crew-neck Shirt Smiling

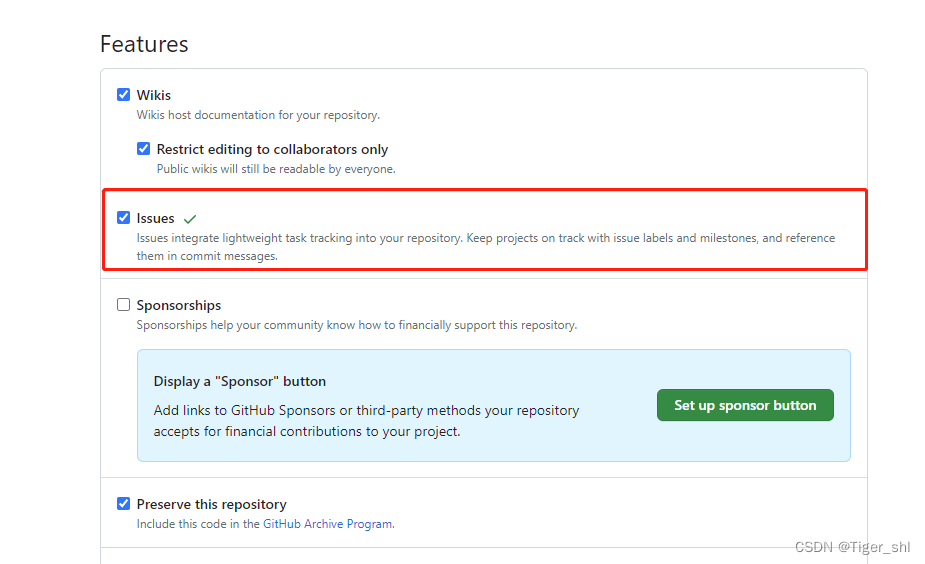
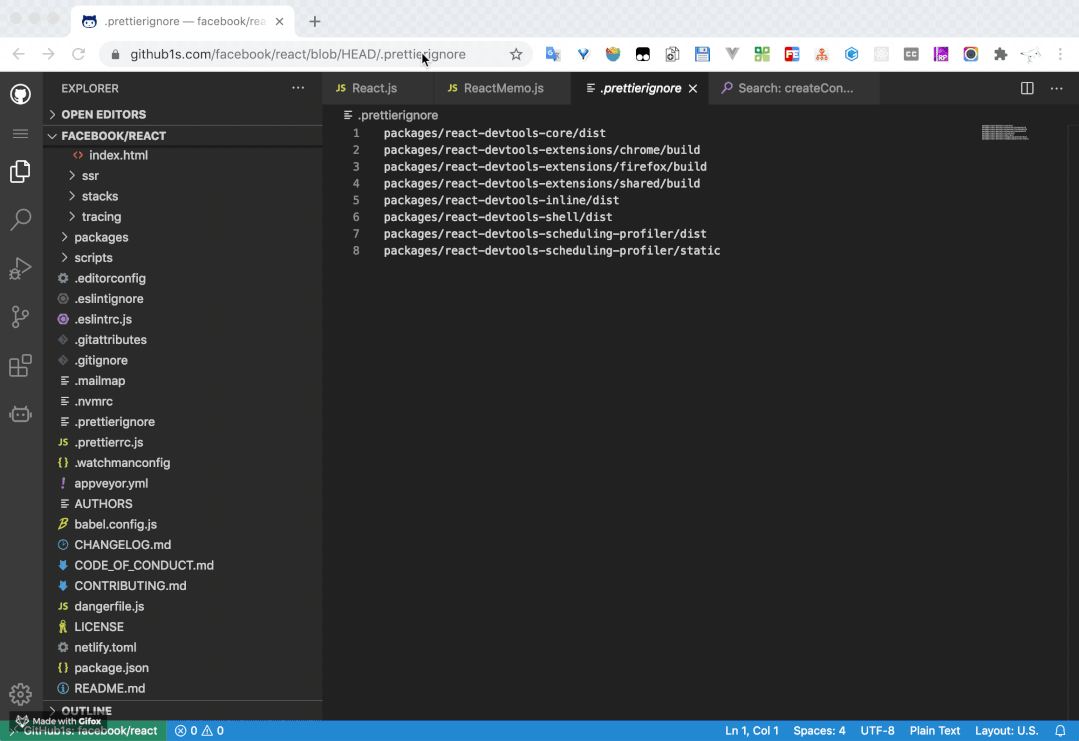
刚刚,github重磅发布四大新功能

Baixar logotipo do github, ícone do git hub em fundo branco
十方融海小智AI跃居GitHub全球排行榜第一,引领AI硬件新时代_TOM资讯
小智2
乐鑫代理商飞睿科技,官方整活,github 爆火的“小智”ai,出新品了!

这个火爆全网的ai小智,真的智能吗?还能陪你聊天

Clouds Landscape Photography


官方整活,github 爆火的 小智 ai,出新品了
十方融海小智AI跃居GitHub全球排行榜第一,引领AI硬件新时代_TOM资讯
小智 (4)
十方融海小智ai跃居github全球排行榜第一,引领ai硬件新时代-千龙网·中国首都网

moji 小智ai.moji 是一款基于小智ai的衍生版桌面 - 抖音

Man in Brown Button Up Shirt

Master Large Language Models in 2026: 10 Must-Visit GitHub Repositories for AI Developers

收藏 学习python的11个顶级github存储库
十方融海小智AI跃居GitHub全球排行榜第一,引领AI硬件新时代_TOM资讯
智行IP-小智XIAOZHI延展 …
github 仓库数量破亿了!-infoq

diy|mac 搭建 esp-idf 开发环境及编译小智 ai

Close Up Photography of Penguin on Snow

Xiaozhi ESP32 – Tự xây dựng trợ lý AI với chi phí “dạt dẻ”
03 github
十方融海小智AI跃居GitHub全球排行榜第一,引领AI硬件新时代_TOM资讯
小智 - 堆糖,美图壁纸兴趣社区
对手都上市了 他们却还在临阵换帅GitHub更换CEO

小智!我成为比雕了😭 - 抖音

White Capsules on Yellow Background

What Exactly Is GitHub Anyway? | TechCrunch
时隔五年,github再次上架android app 4000万开发者终于用上官方版了
XiaoZhi AI - 小智AI
小智ai机器人怎么自定义回答
该研究团队先是搜集和分析了github的大约400万用户的行为记录

历代小智的造型都来自游戏男主!《无印》小智→赤红,《ag》小 - 抖音

GitHub Copilot, the virtual assistant that suggests lines of code, is now available to all de...
Person Holding a Black and White Paper with Message

2021 github年度报告 7300万开发者,最爱的依旧是javascript
十方融海小智AI跃居GitHub全球排行榜第一,引领AI硬件新时代_TOM资讯
AI: ESP32S3 小智AI
10 GitHub Repositories to Master Large Language Models

esp32小智ai盒子真香吗?

GitHub Desktop

Cat in Close Up

github2
2.8 寸ESP32-S3 小智AI 快速使用手册
小智 - 堆糖,美图壁纸兴趣社区
小智github 来自网易

ai小智激活了怎么不能说话 - 抖音

How to Prepare for GitHub Copilot Certification Exam (GH-300) in 2026?

Woman Sitting in Front of Laptop

十方融海是战略投资浙新四维,开启情感ai产业升级新征程的共创者
电商导航- 导航侠
小智 - 堆糖,美图壁纸兴趣社区
带你了解一下神奇的github

📱探索小宇宙博客app的魅力✨
![Create a staging workflow by github-learning-lab[bot] · Pull Request #1 · rotasiztaksi/github-actions-continuous-delivery-azure](https://i.pinimg.com/236x/71/29/1d/71291d609069b8394a9c6fdd9ba854a0.jpg)
Create a staging workflow by github-learning-lab[bot] · Pull Request #1 · rotasiztaksi/github-actions-continuous-delivery-azure

Blue Staircase in Red Wall Graphic

github是什么
毫无预兆封禁受美国制裁国家账号!GitHub回应:身在圈内,有心 ...
小智 - 堆糖,美图壁纸兴趣 …
小智github zhuanlan.zhihu.com

GitHub Copilot

小智ai聊天机器人首次体验,智能程度让人惊讶

Human Using Laptop Beside Teacup on the Wooden Table

git和github
十方融海亮相2025云栖大会,以小智AI引领情感智能硬件新潮流-行业 ...
MDK编译过程及ARM编译工具链- …

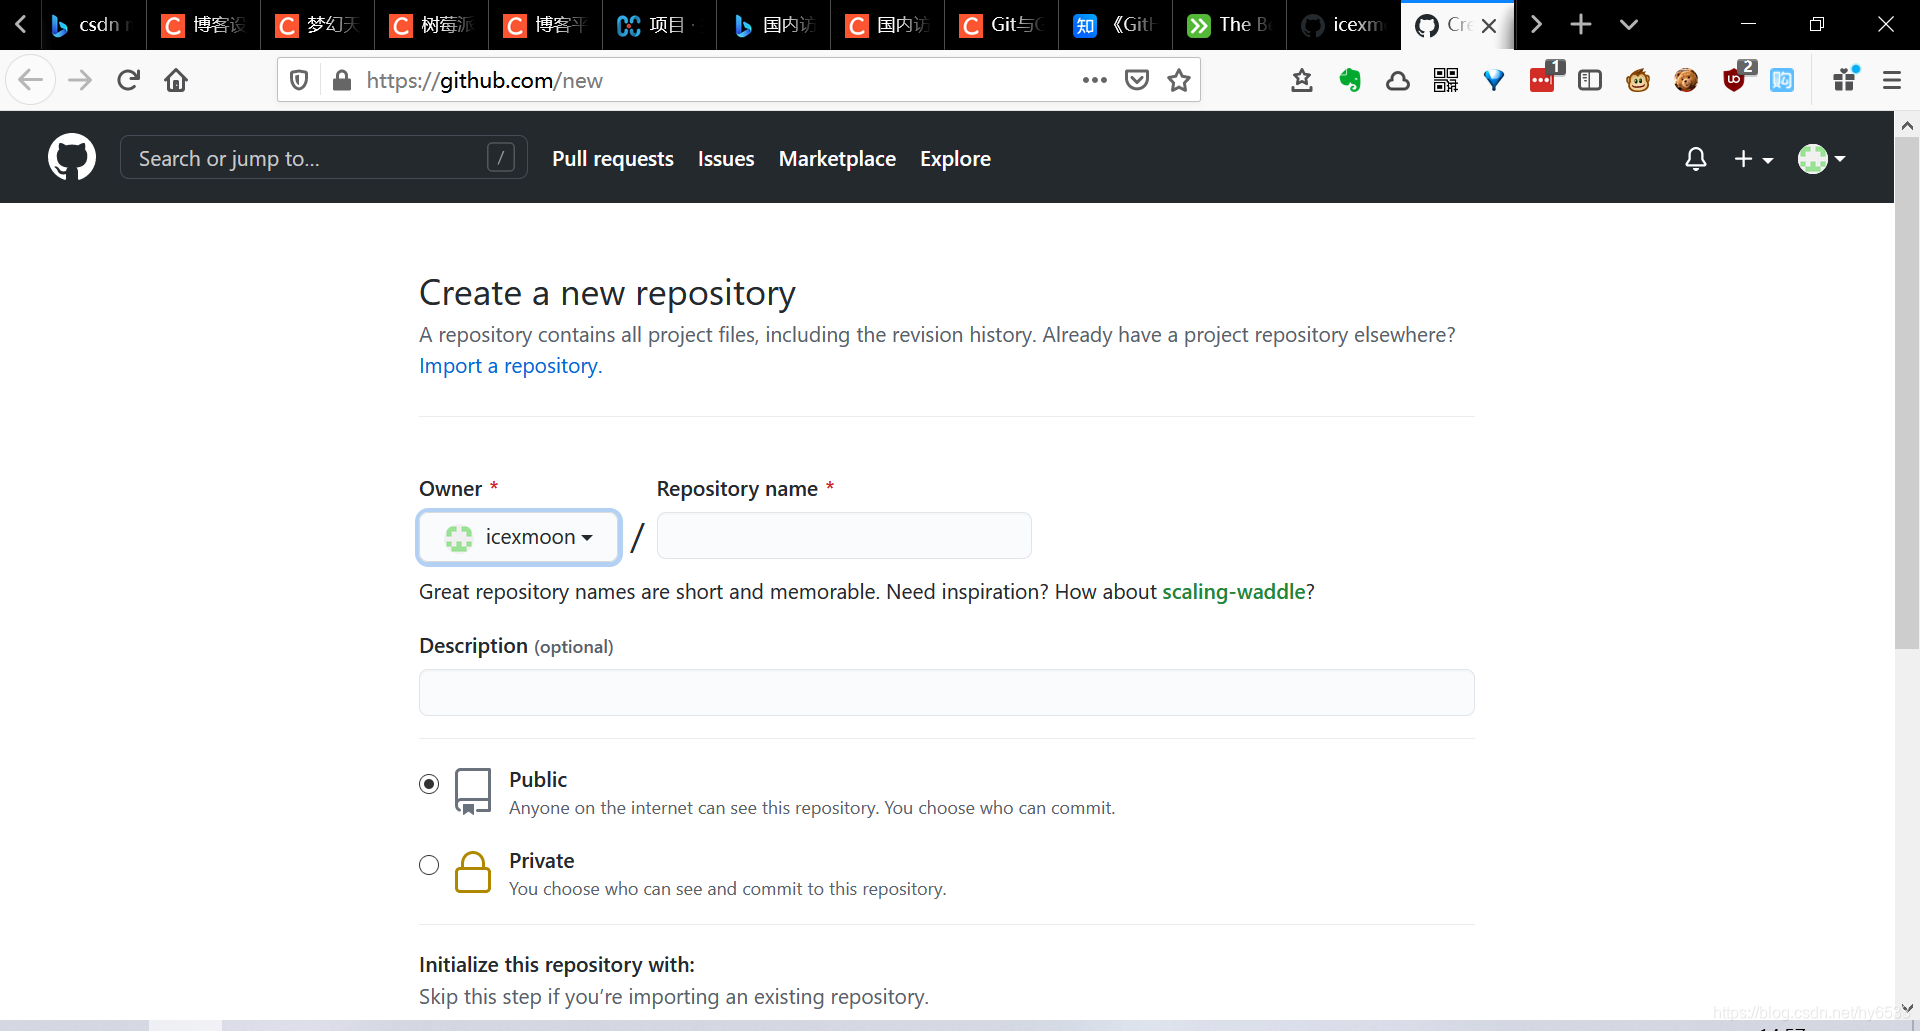
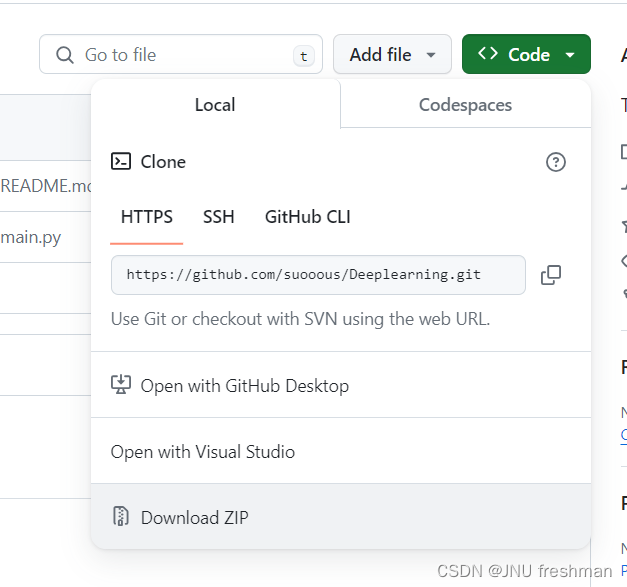
Technology News - Start sharing your code: Everything you need to know about Git and GitHub Read more Technology News Here --> https://digitaltechnologynews.com If you’ve ever explored the world of software development, then chances are you’ve heard of GitHub. This code hosting platform is one of the most popular ways for developers to host their projects and share them with others. Today, some of the best-known open source projects use GitHub, including Firebase, React Native, and TensorFlow. Google even have their own GitHub repositories, where you can find all of the Android sample apps. There’s lots of different reasons why you might be interested in getting to grips with GitHub. Maybe you’ve seen a great project but are unsure how to get its source code from the GitHub website and onto your local machine, or maybe you’ve developed your own Android app and want to share it with the world. Perhaps you’ve fixed a bug in a project that’s hosted on GitHub and want to contribute your code back to the original project. In this article, I’ll provide a complete introduction to both GitHub and Git (and explain the differences between the two!) By the end of this article, you’ll have created a repository on your local machine and a remote repository on the GitHub website, connected the two, and will have pushed multiple files from your local repository, to a publicly-available GitHub repository. Since collaboration is a huge part of GitHub, I’ll also show you how to create multiple branches within the same repository, and how to submit a pull request, so you can start contributing to any project that’s currently hosted on GitHub. What is GitHub? GitHub is a website of repositories where developers can store and share their projects, and contribute to other people’s projects. GitHub supports all programming languages, and all file types including images, videos, spreadsheets and text files. Although we tend to think about GitHub in the context of software development, you could use GitHub to host a project that doesn’t contain any code, for example Microsoft store all of their Azure docs over at GitHub. GitHub can also help developers collaborate on a project, whether that’s working with other members of your development team or collaborating with people who simply like your project and want to help out. Anyone can use GitHub to raise issues, suggest new features, and even contribute code to another person’s project, so by hosting your project on GitHub you could find yourself with a whole new team of contributors! By promoting this kind of collaboration, GitHub has developed strong ties with the open source community, which is a method of software development where a project’s source code is freely available. When you can view a project’s source code, you can also fix bugs, add new features, and use the code as the basis for your own projects – and GitHub is ideally suited to each of these tasks! Depending on how the original open source project is licensed, you may even be able to use it as the basis for commercial products, for example there’s countless commercial Linux distributions available (although whether that includes Android is still up for debate!) What’s the difference between Git and GitHub? GitHub and Git are often used alongside each other, and sometimes the terms are even used interchangeably, but they are two distinct tools. Git is a distributed version control tool that runs locally on your computer, and that you can use to manage your project’s source history. GitHub is a cloud-based platform built around the Git tool. The following screenshot shows an example of a GitHub repository. Typically, you’ll use Git to connect to GitHub, and then use Git to perform tasks such as pushing your code to GitHub, and pulling code from GitHub. While cloud-based hosting services such as GitHub are frequently used with Git, Git doesn’t require GitHub to function. You could potentially use Git to perform version control and work collaboratively, without ever creating a GitHub account. Getting started: Git, GitHub.com or GitHub Desktop? There’s several ways that you can interact with GitHub, including some methods that don’t require you to issue any Git commands. To give you the best possible overview, I’ll be covering three major methods: Installing Git and issuing Git commands from your Mac’s Terminal, or the Command Prompt if you’re a Windows user. Heading over to GitHub.com, and navigating its various menus. as shown in the following screenshot. Using the popular GitHub Desktop app, as shown in the following screenshot. By the end of this article, you’ll have performed some essential GitHub tasks using each of the above methods, so you’ll be in a position to choose which approach works the best for you. Setting up Git and GitHub To start, you’ll need to create a GitHub account and install the Git version control tool. Open your web browser and head over to the GitHub website, select “Sign Up” and then follow the onscreen instructions to create your GitHub account. Assuming you’re not a student, you can choose between a Free or a Pro account. If you opt for the free account, then you’ll be limited to three collaborators for any private repositories you create. If you invest in a Pro account ($7 per month at the time of writing) then you’ll have unlimited collaborators plus access to some additional tools and insights. If you’re a student, then it’s worth looking into the free GitHub Student Developer Pack, which provides access to some additional tools, including Amazon Web Services, Heroku, Unreal Engine, and Microsoft Azure. Next, you need to install and configure the Git version control system: Head over to the Git website and download the latest version for your operating system. Once Git has downloaded, launch the file and follow the onscreen instructions to install. You now need to configure Git, so launch a Terminal (macOS) or Command Prompt, if you’re a Windows user. Copy/paste the following command into the Terminal/Command Prompt window, making sure to replace “Name” with your GitHub username: git config -- global user.name "Name" Press the “Enter” key on your keyboard. Copy/paste the next command into the Terminal or Command Prompt – don’t forget to replace user@example.com with your own email address! git config --global user.email user@example.com Press the “Enter” key. Understanding GitHub projects Every GitHub project is stored in its own repository, which is typically divided into multiple files and folders. Although GitHub users can technically structure their projects however they want, there’s a few files that you should incorporate into every GitHub project. If you navigate to pretty much any repository on GitHub.com, then you’ll almost always find one or both of the following files: README.md. This should contain essential information about your project, including how to build it on your local machine. Since a README file is usually just plain text, throughout this tutorial we’ll be creating dummy README files and then committing them to different remote GitHub repositories. LICENSE.md. Just because a project is open source, doesn’t automatically mean you can do whatever you want with it! The term open source covers a wide range of different licenses, and some of these licenses have very strict rules about how you can use, modify and redistribute the project’s code. Before doing anything with a project, you should read its accompanying LICENSE.md carefully, to ensure you’re not going against the developer’s wishes. If a GitHub project doesn’t contain a LICENSE.md file, then you may be able to find some licensing information in its README file instead. If in doubt, then you can always reach out to the project’s owner for clarification. Creating your first GitHub repository GitHub provides a way to share your work without any of the time, effort or cost typically associated with maintaining your own website or code-hosting platform: simply upload your project to GitHub, and anyone will be able to download and contribute to it. To host a project on GitHub, you’ll need to create two repositories: A local repository, which is essentially just a regular folder on your local machine. This should contain all the files and folders that you want to push to GitHub. A remote repository on the GitHub.com website. Your local and remote repositories will communicate with one another via Git. Once you’ve connected these two repositories, you can continue to work on your project as normal on your local machine, while periodically pushing your changes to GitHub, as and when required. Let’s start by creating a remote repository. We can complete this task without issuing any Git commands, by using the GitHub.com website: In your web browser, head over to GitHub.com and log into your GitHub account, if you haven’t already. In GitHub’s toolbar, select the “+” icon, followed by “New Repository.” Give your repository a name and provide a description. Decide whether your repository should be public, or private. Unless you have a specific reason not to, you should make your repository public so that other people can download it, and perhaps even contribute to your project at some point. You now have the option to automatically generate an empty README file, by selecting the “Initialize this repository” checkbox. Since we’ll be creating this file manually, make sure you leave “Initialize this repository” deselected. When you’re happy with the information you’ve entered, click “Create Repository.” GitHub will now create a remote repository, ready and waiting for your first commit. Creating a local repository with “git init” Next, you’ll need to create a local repository and connect it to your remote repository. For this step, we need to delve into Git commands: On your local machine, create a folder in any location. I’m going to create a “TestRepo” folder on my Desktop. Launch your Mac’s Terminal, or Command Prompt if you’re a Windows user. We now need to change directory (cd) so that the Terminal or Command Prompt is pointing at the local repository you just created, which for me is “/Desktop/TestRepo.” In the Terminal or Command Prompt, type “cd” followed by the complete file path of your local repository. For example, here’s my command: cd /Users/jessicathornsby/Desktop/TestRepo Run this command by pressing the “Enter” key on your keyboard. To transform “TestRepo” into a local GitHub repository, you’ll need to create a .git subdirectory containing all your repository’s metadata. To create this subdirectory, type the following command into your Terminal or Command Prompt, and then press the “Enter” key: git init At this point, your “TestRepo” folder is an initialized repository that can communicate with your remote GitHub repository. You just need to let Git know which remote repository it should be communicating with! Copy/paste the following command into the Terminal or Command Prompt, but don’t press the “Enter” key just yet: git remote add origin You need to specify the URL of your remote repository, followed by the .git suffix. For example, I’m connecting my local repo to https://github.com/JessicaThornsby/TestRepo, so here’s my command: git remote add origin https://github.com/JessicaThornsby/TestRepo.git Press the “Enter” key on your keyboard. From this point onwards, your local repository will remember which remote repository it needs to send its changes to. Uploading a file to your GitHub repo Now we’ve connected our local and remote repositories, let’s look at how we can use this connection to send a file from our local machine, to the GitHub servers. I’ll be using an empty README text file, but you can use any file you want. Just be aware that by the end of this section, your file will be publicly available on GitHub.com, so make sure it doesn’t contain any personal information. Create or find the file that you want to push to GitHub.com, and then drag and drop this file into your local repository i.e the folder on your local machine. Now, we need to prepare our commit, by picking and choosing which items we want to “add” to Git’s staging area. Every item placed in Git’s staging area, will be bundled into your next commit, and eventually pushed to GitHub. In the Terminal or Command Prompt window, type “git add” followed by the name and extension of each item that you want to add to Git’s staging area, for example: git add ReadMe.txt Press the “Enter” key on your keyboard. You can now prepare your commit, using the “git commit” command. At this point you can also add an optional commit message describing all the changes included in this commit. By providing a message for each commit, you’ll create a complete history of your project, which can be invaluable for other members of your team, but can also be useful if you ever need to pinpoint when a particular change occurred. You provide a commit message using an “-m” flag, which is exactly what I’m doing with the following command: git commit -m "creating a README file" Press the “Enter” key on your keyboard. Now you’re ready to push this commit to your remote GitHub repository. We’ll be exploring multiple branches in the next section, so for now just be aware that we’re pushing this commit to our repository’s master branch. Copy/paste the following command, and then press the “Enter” key: git push -u origin master When prompted, enter your GitHub username and password, and then press “Enter.” Git will now push your commit to GitHub’s servers. In your web browser, head over to GitHub; the README file should now be appearing in your remote repository. Branching and merging Branching is a core concept of Github, as it allows you to maintain multiple versions of the same project simultaneously. Branching is often used to experiment with new features and code before committing this work to the project’s master branch, which is generally considered its stable branch. For example, if you take a look at the repository for Google’s cross-platform Flutter SDK, then you’ll find branches such as “dev” and “beta” which contain code that isn’t currently considered stable, but may at some point be pulled into the stable master branch. By publishing experimental code to GitHub, you can get feedback from your users, collaborate with other developers, or simply have the added security of knowing that even if your local machine crashes, you won’t lose that experimental code you’ve been working on. Branches can also be used to develop versions of your project that are tailored for a particular client, user demographic, or operating system. Since branching is such a huge part of GitHub, let’s add a branch to our repository: In your web browser, navigate to your remote GitHub.com repository. Find the “Branch: Master” button (where the cursor is positioned in the following screenshot) and give it a click. In the subsequent window, type the name of the branch that you want to create. I’m naming mine “beta.” Select “Create branch.” You now have two branches, and can navigate between them by selecting your repository’s “branches” tab. Working with multiple branches Currently, our two branches contain exactly the same README file. To get an overview of how you’d typically use branching in your real-world projects, let’s make some changes to the “beta” version of README, as if this is the experimental version of this file. We’ll then assume these changes have been approved, and merge the beta README with the version in our stable branch. To make things easier, I’m going to edit the README directly in GitHub’s text editor: Switch to your “beta” branch by selecting your remote repository’s “branches” tab, followed by “beta.” Find the little pencil icon that appears alongside the README file, and give it a click. You should now be viewing README in GitHub’s text editor. Make some changes so this version of the file is noticeably different to the version in your master branch. Once you’re happy with your changes, scroll to the bottom of the page and make sure the following checkbox is selected: “Commit directly to the beta branch.” Click the green “Commit changes” button. At this point, you’ll have different versions of README in your master and beta branch. Merging your changes: Making a pull request You merge changes from one branch into another branch by opening a pull request. When you open a pull request for a third party project, you’re essentially asking the project’s owner to review your branch and (hopefully) pull your work into their branch. However, you also need to submit a pull request if you’re the owner of both branches, which is exactly what we’re doing in this section. When you create a pull request, GitHub will highlight all the differences (referred to as “diffs”) between these branches, so you can preview the finished result before going ahead with the merge. Let’s submit a pull request, to merge the beta README into the stable README: In your web browser, select GitHub’s “Pull requests” tab. Click the green “New pull request” button. In the “Example comparisons” box, select the branch that you just created, which in my instance is “beta.” GitHub will now highlight all the “diffs” between this branch and the master branch. Review these differences, and if you’re happy to proceed then click the “Create pull request” button. Give your pull request a title and provide some text describing your changes. If you’re submitting this pull request to a third party then it’s particularly important to provide as much information as possible. Where appropriate, you can also attach files such as screenshots and videos, to help illustrate your proposed changes. When you’re happy with the information you’ve entered, click “Create pull request.” Reviewing GitHub merge requests Since we’re working within the same project, we’ve essentially sent a pull request to ourselves. In this section, we’ll review and accept the pull request, which will merge the beta README into our stable branch: Select the “Pull requests” tab. This screen displays all the pull requests you’ve received over the lifetime of your project. Find the pull request you just submitted, and give it a click. Review the information about this pull request, including any potential conflicts that GitHub has identified. If you’re happy to proceed, then find the “Merge pull request” button and click its accompanying arrow. At this point, you can choose to “Squash and merge,” “Rebase and merge,” or “Create a merge commit.” To merge all the commits from the beta branch into the master branch, select “Create a merge commit.” Select “Confirm merge,” and all the changes from your beta README file will be merged into the master README file. GitHub Desktop: Using an app Throughout this tutorial, we’ve used a combination of Git commands and the GitHub website, but you can also interact with GitHub using a dedicated app. Applications can be particularly useful when you’re first getting to grips with GitHub, as they allow you to perform complex tasks without having to know a tonne of Git commands. In this final section, I’ll show how to setup the popular GitHub Desktop app, and then use it to perform some essential GitHub actions. Head over to the GitHub Desktop website and download the latest version. Launch the resulting ZIP file. Launch GitHub Desktop, and when prompted select “Sign into GitHub.com” Enter your GitHub username and password. You should now be taken to the main GitHub Desktop user interface. Creating local and remote repositories, without Git commands You can use GitHub Desktop to connect to an existing repository, but this application makes it particularly easy to create a pair of connected local and remote repositories. In this section, I’ll show you how to create two new repositories, and then push a file from your local machine to the remote GitHub servers, using the GitHub Desktop app. Launch GitHub Desktop, if you haven’t already. Inside the app, select “File > New Repository” from the menu bar. Give your repository a name and provide a description. Specify where this local repository should be created on your computer, either by typing the complete file path or by selecting “Choose…” and then navigating to the desired location. When you’re happy with the information you’ve entered, click “Create repository.” To create a corresponding remote repository, select the “Publish repository” button. Head over to GitHub, and you should notice that a new, empty repository has been created for your account. Push to origin: Building your commit You can now work on a project inside your local repository, as normal, and commit your work as and when required. As before, let’s try pushing a dummy README to our remote repository: Navigate to the location where you created your local repository. If you’ve forgotten where this is, then GitHub Desktop has a helpful “Show in Finder” button, or you can select “Repository > Show in Finder” from the GitHub Desktop menu bar. Create or find the file that you want to commit to GitHub. Remember that this file will be publicly available, so make sure it doesn’t contain any personal information! I’ll be using a README text file. Drag and drop your chosen file into your local repository. The GitHub Desktop app should now update to display all the changes you’ve made to the local repository. Towards the bottom-left of GitHub Desktop, enter a summary and a description explaining the work that’s included in this commit. To prepare your commit, click the “Commit to master” button. When you’re ready to push your changes to GitHub, select “Push origin” from the GitHub Desktop toolbar. Head back over to GitHub.com – your file should now be available in your remote repository. GitHub Desktop can perform a wide range of additional tasks, so if you prefer interacting with GitHub using an application, then you should check out GitHub Desktop’s docs for more information. Wrapping up This article covered everything you need to know, in order to start using GitHub. We looked at how you can complete all the essential GitHub tasks, including creating local and remote repositories, submitting pull requests, and merging multiple branches. To help provide an overview of all the different ways that you can interact with GitHub, we moved between using Git commands, the GitHub.com website, and the GitHub Desktop application. Which method do you prefer? Let us know in the comments! Source/Original Post -> https://www.androidauthority.com/git-github-guide-995047/ #tech #news #trending #gadgets | Facebook

Eiffel Tower
超级详细的github双重验证密码忘记或者获取不了了怎么办 github recovery code忘记怎么办
GitHub Copilot 代理模式:能自動幫你製作一個手機APP! - 灣仔298 ...
十方融海小智AI跃居GitHub全球排行榜第一,引领AI硬件新时代_…


Man in Brown Polo Shirt

github
GitHub重磅年度报告:4000万程序员最爱开源项目和编程语言排名 ...
使用权资产入账是含税还是不含税的-牛账问答

How I Learned Git & Git-Hub
github

Red Armchair on Brown Surface
ESP32 S3 AIOT综合示例—— AI语音交互引擎库&Arduino版小智AI ...
小智 - 堆糖,美图壁纸兴趣社区


git与github

Smiling Man with Stickers on his Face
這款多風格開源AI圖像生成功能在小紅書爆紅Github也登上熱搜榜
小智 - 堆糖,美图壁纸兴趣社区

KI-Agenten: Was sie wirklich sind – und warum Chatbots nicht reichen

二. 什么是github

Turned on White Laptop Computer
4 个月登顶GitHub 星标第一!OpenClaw 颠覆开源格局,AI Agent ...

小智 - 堆糖,美图壁纸兴趣社区

一个开源跨平台的多功能 steam 工具箱

Dude With Sign
虾哥更新了立创ESP32-S3的触屏功能- 雾非雾

小智 - 堆糖,美图壁纸兴趣社区
git和github

White Painted Wall
十方融海惊艳亮相2025云栖大会以小智AI开启情感智能潮流的领先 ...

Learn, Code, Get the Job | gitconnected
小智 - 高清图片,堆糖,美图壁纸兴趣社区

关于git与github

Eyeglasses in Front of Laptop Computer
开源即阶梯:一位00后如何登上MLOps全球舞台- 开放原子开源基金会
小智 - 高清图片,堆糖,美图 …
从零开始github

Man Standing in the Middle of Road
给龙虾发工牌、定MBTI!OpenClaw 智能体从玩具变同事,工作协作 ...
小智 - 超级百科

从零开始github

Man in Black Zip-up Hoodie
吾有一术,名曰炼丹。北大博士生用文言开发深度学习网络,还有 ...
小智 - 高清图片,堆糖,美图壁纸兴趣社区

gito github client
OpenAI挑戰微軟GitHub!擬推新程式碼託管平台
C#连接小智服务器并将音频解码播放过程记录 - mingupupup - 博客园
github 删除代码等于 任何人均可永久访问 微软回应 这是特性
GitHub Copilot讓你寫程式快10 倍!AI 程式開發大解放]| 一本My ...
C#连接小智服务器并将音频解码播放过程记录 - mingupupup - 博客园

10.22 脚本 手机生成,文件差异报告
程序员必备的5款提升效率的实用AI代码工具- 小默AI工具导航网
小智 - 高清图片,堆糖,美图 …
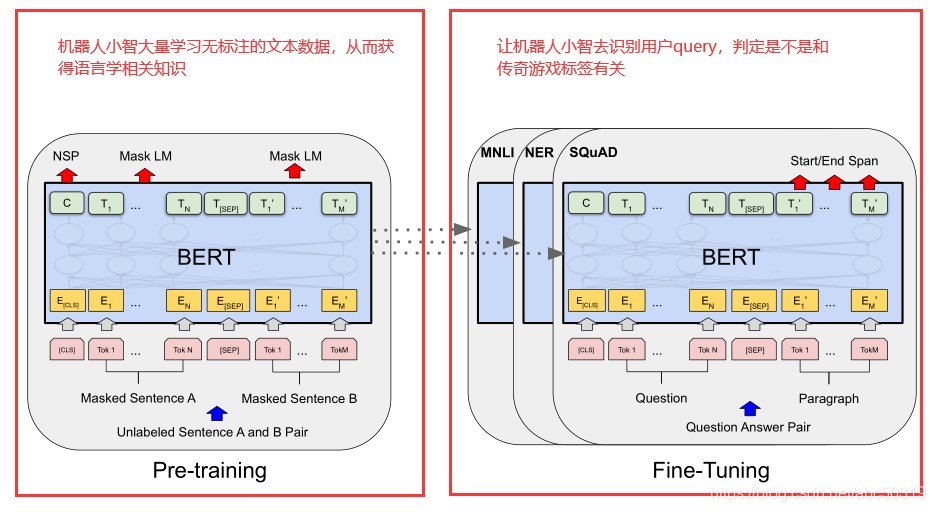
广告行业中那些趣事系列3 nlp中的巨星bert
Dotnet9 网站新添AI 小工具,赋能创作超给力! - 码坊
小智 - 高清图片,堆糖,美图 …

有github霸榜半年的java并发图册 jdk源码剖析笔记在手,我终于不慌内卷了
开源即阶梯:一位00后如何登上MLOps全球舞台- 开放原子开源基金会
小智 - 高清图片,堆糖,美图壁纸兴趣社区
我开源了一个基于vue的组织架构树组件
這款多風格開源AI圖像生成功能在小紅書爆紅Github也登上熱搜榜
小智 - 高清图片,堆糖,美图壁纸兴趣社区

github2
开源即阶梯:一位00后如何登上MLOps全球舞台- 开放原子开源基金会
小智 - 堆糖,美图壁纸兴趣社区

github
文言文不能编程乎?中国大四小哥哥曰:非也新智元原创 来源 ...
小智 - 高清图片,堆糖,美图壁纸兴趣社区

github
开箱即用,你不可错过的好东西「GitHub 热点速览」 - 小默AI工具 ...
小智 - 高清图片,堆糖,美图 …
github与git
GitHub重磅年度报告:4000万程序员最爱开源项目和编程语言排名 ...
小智 - 高清图片,堆糖,美图壁纸兴趣社区

github2
开源即阶梯:一位00后如何登上MLOps全球舞台- 开放原子开源基金会
小智 - 高清图片,堆糖,美图 …

github
养虾」热潮的AB面-外盘期货-正大期货-正大国际期货-专业国际期货 ...
小智 - 高清图片,堆糖,美图壁纸兴趣社区
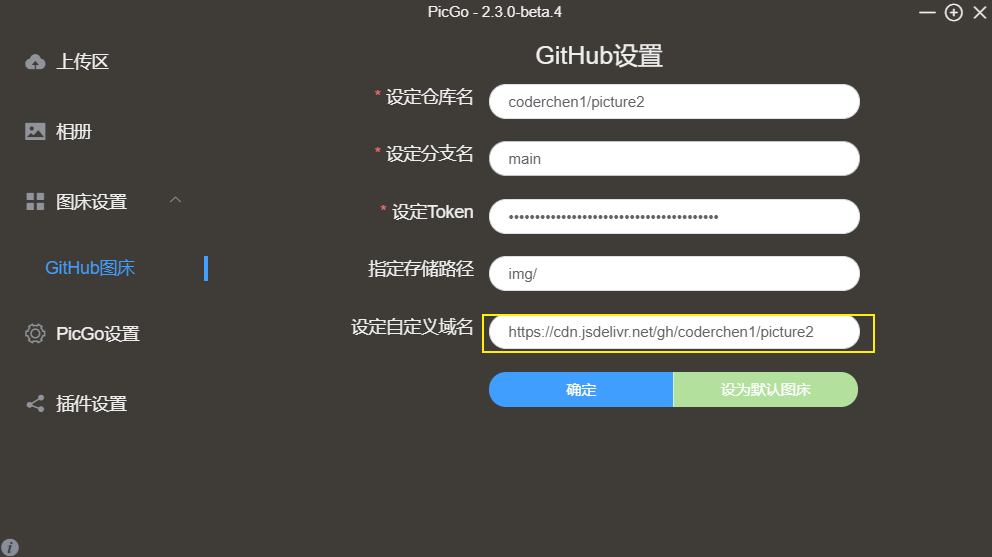
个人图床 jsdelivr github picgo
OpenClaw爆火60天:中国产业AI落地的“又一次集体进化” - 产业家
十方融海小智AI已跃居Git…
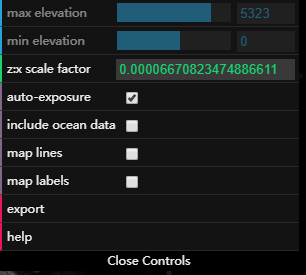
不会gis的我,仅花半小时就用ps生成了真实且高级的3d地形图 附神器安装包
AI時代Math元年:用Python全精通機器學習- 香港書城網上書店Hong ...
十方融海小智AI已跃居Git…
git和github
SmartMediaHub - 智能自媒体管理平台- DeepSeek 导航网
不走寻常路的写作工具 我的 vs code 配置经验分享
十方融海亮相2025云栖大会,以小智AI引领情感智能硬件新潮流-行业 ...
这套 github 上 85k star 力扣刷题笔记,可以帮你搞定 80 以上的 算法 面试
零工智享365
在线vs code阅读源码神器 github1s
智元机器人再掀具身智能浪潮,全球首个ViLLA架构大模型GO-1正式 ...

rm相亲特辑,金钟国宋智孝甜出新高度,刘在石还和妻子吵架
GitHub 的开源项目:绝版游戏保护工程-小高网
github里的灭霸脚本,竟都还不是最奇葩的
这个Github项目,一键同步到多个自媒体平台,支持公众号- 点金主题网

github标星235k 这份阿里p9纯手写的java并发核心手册堪称无敌了
Kiro Agentic AI IDE:AI 驅動全端軟件開發,實現規格驅動創新 ...
膜拜 github访问量破百万,阿里内部首次公布的java10w字面经有多强
濠江日報

丢人现眼当小丑 lol小智谈王思聪成圈内笑柄,未料想如此不堪
2026 个人可以做小程序吗?条件、流程与变现方案- 固乔网-固乔 ...
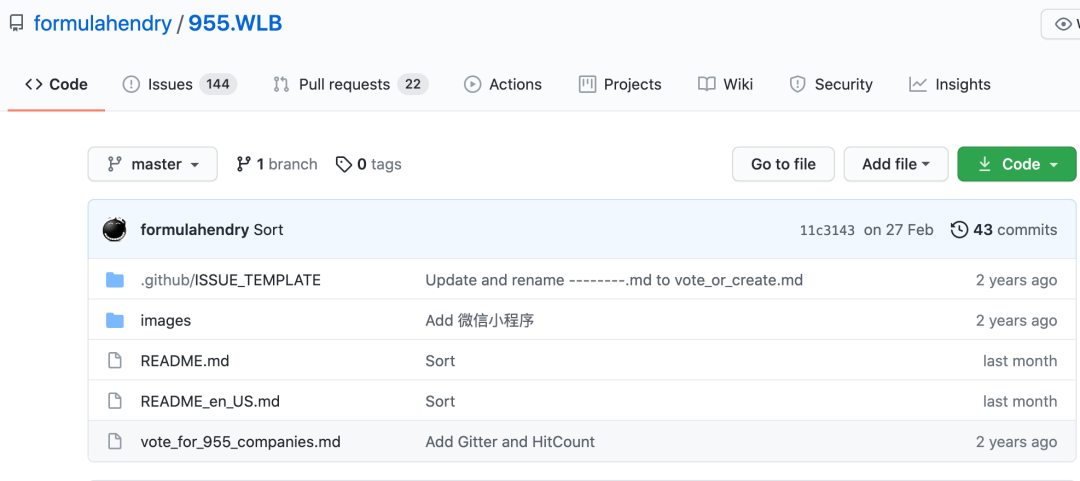
955 不加班的公司名单 2021 年4月最新版
个人站群

图像翻译 语义分割 域适应 图像检索 无监督学习cvpr2021
OpenClaw爆火60天:中国产业AI落地的“又一次集体进化” - 产业家

和男友逛街差点跟别人回家,这组照片太巧合
AI免费公开课一网打尽!14个类别、230门课程,GitHub标星6k+ | 极牛网

十方融海小智ai成为github万星项目引领全球ai开发者共创新潮流
2.8 寸ESP32-S3 小智AI 快速使用手册
github
CFG Labs 对话Hugging Face:打造机器学习的Github - Foresight News
OpenManus - AI平台| AI工具集|AI资讯站
2026年收银系统怎么选?这三款真能帮小店省下心! - 固乔网-固乔 ...
数字人- 看见AI
人工智能图像生成评测成绩单公布: 字节跳动百度表现亮眼 ...
SuperCLUE-Industry: 中文原生工业大模型测评基准
CogVideoX - AI平台| AI工具集|AI资讯站
大事不好:机器人学会预测未来了– 环球科技
这个Github项目,一键同步到多个自媒体平台,支持公众号- 点金主题网
华为小艺- AI平台| AI工具集|AI资讯站
彭博:內地政府禁用「龍蝦」 港:關注風險AI代理OpenClaw冒起專家 ...
騰訊「小龍蝦」WorkBuddy相容OpenClaw 標榜下載容易「一分鐘上崗 ...
智谱压轴力作GLM-4.7 实测:从基准刷榜到任务交付,稳坐开源第一 ...
极客视界
雷池WAF安全加固:基于OAuth 2.0与微信开放平台的双因子认证– 小 ...
十方融海惊艳亮相2025云栖大会以小智AI开启情感智能潮流的领先 ...
OpenClaw意外走红,智谱、MiniMax、Kimi终于“得救”了- 创新 ...
Pytorch 1.1.0驾到!小升级大变动,易用性更强,支持自定义RNN 新 ...
Apple 擁抱AI 源於高層試用GitHub Copilot 本來一直避免強調AI ...
家政服务小程序开发公司推荐:本地服务商测评- 固乔网-固乔科技 ...
介面測試自動化極緻應用--Postman+Jenkins+Github一路整合]| 一 ...
华为物联网操作系统LiteOS主库迁出GitHub | 极牛网
2.8 寸ESP32-S3 小智AI 快速使用手册
通研院发表物理可交互的3D场景生成Physcene,显著提升具身智能体 ...
WPF开源控件库- HandyControl - 码坊
CFG Labs 对话Hugging Face:打造机器学习的Github - Foresight News
superclue_idea.jpeg
DeepSeek 节后GitHub 猛更代码!华尔街集体紧张,纳斯达克预警“第 ...
4.5K stars,Github开源项目48小时内搞定Google索引- 点金主题网
MCP是一个安全噩梦? 看Agent安全框架如何解决它! | 极牛网
實用連結– 香港培道小學
AI免费公开课一网打尽!14个类别、230门课程,GitHub标星6k+ | 极牛网
ESP32 S3 AIOT综合示例—— AI语音交互引擎库&Arduino版小智AI ...
FastAPI增速2.4倍!3大Python框架之父告诉你2025该选谁- 飞哥专栏
Solo 独立开发者社区-链接每一位独立开发者, 从Solo 开始
ChatGPT 降智:终极解决方案- AI智能王
MKEAI - 发现AI的力量|最新AI资讯、应用、AI工具集与交流社区
美国新闻网-美国华文媒体融合平台-旅美华人的精神家园- 全球首家 ...
濠江日報
基于C# .NET8的市电监测小工具(配合UPS食用) | 时易うさぎのBlog
小机构教培数字化:线上线下课程统一管理小程序推荐- 固乔科技
CFG Labs 对话Hugging Face:打造机器学习的Github - Foresight News
观测云MCP Server 接入和使用最佳实践| 可观测学堂Observability
国产开源GLM-Image实测:文字渲染登顶SOTA,画面质感仍是最大瓶颈 ...
华为物联网操作系统LiteOS主库迁出GitHub | 极牛网
基于abp vNext和.NET Core 开发博客-9 接入GitHub,用JWT保护你的API
方舟Coding Plan:实话实说有点难评! – 托尼不是塔克
单机版H5游戏服务端,网游单机H5游戏服务端一键端游戏下载- 零度网 ...
昆仑万维发布AIGC全系列算法与模型,模型已在GitHub开源- Enjoy出海
人工智能图像生成评测成绩单公布: 字节跳动百度表现亮眼 ...
OpenClaw龙虾遭国企银行封杀|存2大安全漏洞.一般人使用安全吗?